
Hej,
Inden det bliver forår, vil jeg skifte alle mine hjul lejer.
Er der nogle der har nogle gode hjemmesider/linke, med en god beskrivelse af udskiftning af hjul lejer (spec. baghjuls lejer)
/John
Udskiftning af hjul lejer på alle 4 hjul
-
(udmeldt) C3
- Indlæg: 151
- Tilmeldt: 20. feb 2004, 01:27
Ja, her er en: Se http://www.fastcorvette.com/RearSpindleSchool.htm Teksten
Ja, her er en:
Se http://www.fastcorvette.com/RearSpindleSchool.htm
Teksten er som følger:
The following Special Tools are all but REQUIRED to do a proper job:
Spindle Knocker (spindle removal tool)
This threads onto your old spindle and protects the threads while you beat on it to break it free from the housing. Even though you may be planning on replacing the old spindle, if you beat on the spindle without the tool, you will very likely mushroom it to the point where you can?t slide the bearings off the end.
Spindle Set-Up Tool
This allows you to slide the bearings on a mandrel instead of the spindle itself to check the endplay of the assembly. The final installed endplay must be between 1 and 8 thousandths. The old shim will only be correct if you are very lucky. Chances are you will have to try one, measure the endplay with a dial indicator, then figure the correct shim and try it again. If you use the spindle as the mandrel for these tests, you would have to do it through the installed pre-greased outer bearing and seal. It?s much preferable to check it dry before installing anything permanently.
Spindle Installation Tool
This tool threads onto the new spindle and allows you to torque the spindle into place. The problem is the outer bearing has to be greased and placed in its race before the grease seal is installed. The spindle then has to be pulled through the outer bearing, and the bearing will have to slide onto the thick shoulder of the spindle where it rides. The installation tool makes this a snap. Without the proper tools, this is tougher.
Assuming you have the right tools, the following is the proper sequence. Without the right tools, you will have to follow along and improvise. The tools are available from Mid America new for about $185 including freight, or you can rent a perfect used set from us for $174 (freight free), use it and return the still perfect used set for a refund of $125. I will also refund $1 for every unused new spindle shim you return.
Lets Begin:
1 The day before you get started, put the car on jack stands, remove the rear wheels and hose down everything you are going to take apart with Liquid Wrench.
2 Remove the rear brake caliper and place a socket between the pads to position them properly. You don?t want to have to bleed the brakes when all this is over!
3 Remove the rotor. If it is riveted to the spindle, the rivets have to go.
4 Separate the halfshaft flange from the spindle flange.
5 Remove the cotter pin from the spindle castle nut. Often you have to drill it out.
6 Using a 1-1/16th inch socket, remove the castle nut from the spindle.
7 Remove the washer and pull the spindle flange off the spindle.
8 Screw on the Spindle Knocker all the way on and hit it squarely and sharply until the spindle lets go. You may have to beat the hell out of it.
9 Using a long punch, tap the bearing races out of the bearing support housing.
10 First clean the grease out of the bearing support housing with a rag, and then scrub it thoroughly with Brake Clean. It can?t be too clean.
11 Assuming you are not reusing the old spindle, you can just set it aside. Removing the old bearing from the shoulder of the spindle is a problem you don?t have to deal with now.
12 Install the new bearing races. Be careful not to deface the bearing surface! Make sure they are ?home?; nestled all the way into the housing to the stop.
13 Using the Spindle Set Up Tool, place the outer bearing on it all the way onto the shoulder. Stack the spacer and the thickest shim you have onto the mandrel and place it into the housing from the outside. From the inside, place the inner bearing on the tool, and using the thick spindle washer and the nut and sleeve from the installation tool, torque to 100 Ft. Lbs.
14 Measure the endplay with a dial indicator. If you used a .145 shim and the endplay is 17 thousandths, you know that if you replace that .145 shim with a .133 shim your endplay will be 5 thousandths. Remember, the minimum endplay according to GM is .001, the maximum .008. You are better off to be on the tight end of that spec, as in .001 - .004.
15 Repeat the process with the correct spacer and confirm the correct endplay. Its time to pack the bearings. Use a high quality Moly-Graphite grease rated for Extreme Pressure, or better yet, do as we do and use Mobil 1. Pack the bearings by hand and pack the housing with a lot of grease. It doesn?t have to be absolutely full, because the spindle is going to take up some room in there, but it needs to be completely full when you are finished. You don?t ever want to do this job on this car again.
16 Now the tricky part. Put the outer bearing onto its race and install the outer grease seal. Insert the spindle from the outside through the grease seal and the outer bearing, and then from the inside slide on the spacer, the correct shim, the inner bearing and install the inner grease seal.
17 Slide the spindle flange onto the spindle flutes and screw the Spindle Installation Tool on to the end of the spindle. By tightening the nut on the end of the tool, you will draw the spindle into place and into the outer bearing. Torque to 125 FT LBS and make sure the spindle is properly seated. When properly seated, the gap between the spindle and the head of the ¾ inch bolt head that is at the top of the parking brake assembly should be about 300 thousandths, plus or minus. You will notice when more torque yields no more spindle movement.
18 Remove the Spindle Installation Tool and place the washer with the concave side down and thread the nut on the end of the spindle. Torque to 100 FT LBS.
19 Check the endplay again by hand. It will probably be 1 thousandths less than you had with the set up tool if you did everything correctly, and that will be just fine!
20 Put the cotter pin through the castle nut and bolt everything back together.
21 Check the runout on the rotor with your dial indicator. There are 5 possible positions of the rotor on the spindle, and you should pick the one with the least total runout.
22 Ship your spindle tools back to us, along with all your unused shims for a credit of $100 plus $1 per shim.
Congratulations, you are now a qualified Corvette mechanic!
Bemærk sidste linie. :rant:
Forhjulslejerne er til gengæld ret nemme at gå til.
C3
Hold da op :willy_nilly: Det bliver
Hold da op :willy_nilly:
Det bliver sjovt !
/John
Det bliver sjovt !
/John
Hej John´ Du skal bruge noget
Hej John´
Du skal bruge noget special værktøj, har du det, så er det ikke så svært.
Husk at købe shims kit, altså shims i forskellige størelser.
Mvh-Kim651
:patriot:
Du skal bruge noget special værktøj, har du det, så er det ikke så svært.
Husk at købe shims kit, altså shims i forskellige størelser.
Mvh-Kim651
:patriot:
Hej John´ Du skal bruge noget
Hej John´
Du skal bruge noget special værktøj, har du det, så er det ikke så svært.
Husk at købe shims kit, altså shims i forskellige størelser.
Mvh-Kim651
:patriot:
Den her Kim?
http://cgi.ebay.com/ebaymotors/SPACER-AND-SHIM-KIT-REAR-WHEEL-CORVETTE-PART-602682_W0QQcmdZViewItemQQ_trksidZp1638Q2em118Q2el1247QQcategoryZ42614QQihZ002QQitemZ120321804535QQrdZ1QQsspagenameZWD1V
Hej John Ja lige præcis,
Hej John
Ja lige præcis, husk at købe de rigtige lejer
Timken Bearings
MVH-Kim651
Ja lige præcis, husk at købe de rigtige lejer
Timken Bearings
MVH-Kim651
-
(udmeldt) C3
- Indlæg: 151
- Tilmeldt: 20. feb 2004, 01:27
Jeg vil dog fraråde beskrivelsen
Jeg vil dog fraråde beskrivelsen i pkt. 8 - det er en lidt grov måde at tage spindlen af.
Selv bruger jeg denne aftrækker:
http://www.ecklers.com/product.asp?pf_id=A2536&dept_id=1885
PS. Det viste shims kit fra ebay koster faktisk stort set det samme hos Ecklers, idet der er 30% rabat:
http://www.ecklers.com/product.asp?pf_id=32088&dept_id=1882
Eller her: http://www.firstmile.dk/product.asp?product=4795
Aftrækkeren nævnt i pkt. 11 er denne (til at trække inderringen af det yderste leje af spindlen):
http://www.ecklers.com/product.asp?pf_id=A2537&dept_id=1885
Spindle set up tool i 13 er denne:
http://www.ecklers.com/product.asp?pf_id=A2542&dept_id=1099
Værktøjet i pkt. 17 er dette:
http://www.ecklers.com/product.asp?pf_id=A2540&dept_id=1099
TIMKEN baghjulsleje sæt her:
http://www.firstmile.dk/product.asp?product=408
Anbefalet fedt er Castrols APS2 Lithium fedt.
De færdige Trailing Arms kan se sådan ud:
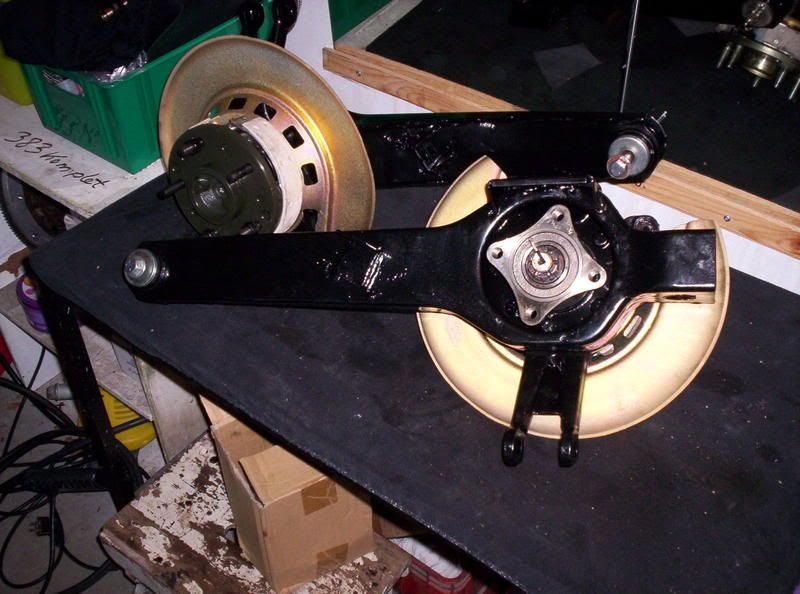
C3
Selv bruger jeg denne aftrækker:
http://www.ecklers.com/product.asp?pf_id=A2536&dept_id=1885
PS. Det viste shims kit fra ebay koster faktisk stort set det samme hos Ecklers, idet der er 30% rabat:
http://www.ecklers.com/product.asp?pf_id=32088&dept_id=1882
Eller her: http://www.firstmile.dk/product.asp?product=4795
Aftrækkeren nævnt i pkt. 11 er denne (til at trække inderringen af det yderste leje af spindlen):
http://www.ecklers.com/product.asp?pf_id=A2537&dept_id=1885
Spindle set up tool i 13 er denne:
http://www.ecklers.com/product.asp?pf_id=A2542&dept_id=1099
Værktøjet i pkt. 17 er dette:
http://www.ecklers.com/product.asp?pf_id=A2540&dept_id=1099
TIMKEN baghjulsleje sæt her:
http://www.firstmile.dk/product.asp?product=408
Anbefalet fedt er Castrols APS2 Lithium fedt.
De færdige Trailing Arms kan se sådan ud:
C3
Hjullejer skift
Jeg fandt for år siden denne her vedlagte instruks, ganske god og med billeder. Dog kan jeg ikke lide at han mener shims lige skal poleres med smergel lærred da de er en kende for tykke.?? Shimsene er hærdede, og polerer/sliber han dem lidt skæve får han et problem med hjullejerne, inderringene vil blive vredet.
mvh jes Nå filen var vel stor, ca 1mb, en del billeder i den, kan jeg sende dig den direkte, ellers kommer jeg tilbage senere,
mvh jes Nå filen var vel stor, ca 1mb, en del billeder i den, kan jeg sende dig den direkte, ellers kommer jeg tilbage senere,
Jeg fandt for år siden
Jeg fandt for år siden denne her vedlagte instruks, ganske god og med billeder. Dog kan jeg ikke lide at han mener shims lige skal poleres med smergel lærred da de er en kende for tykke.?? Shimsene er hærdede, og polerer/sliber han dem lidt skæve får han et problem med hjullejerne, inderringene vil blive vredet.
mvh jes Nå filen var vel stor, ca 1mb, en del billeder i den, kan jeg sende dig den direkte, ellers kommer jeg tilbage senere,
Hej Jes,
Send mail til frederiksenjohn@hotmail.com
/John
Tilbage til "Generelt teknisk forum"
Hvem er online
Brugere der læser dette forum: Ingen og 4 gæster